Unbounce helps marketers create, launch and test high-converting landing pages and website overlays. You may start a free Unbounce trial or select a plan here.
Once integrated, Fullstory gives powerful insights into how users interact with your Unbounce landing pages.
There are two easy options to install Fullstory on your Unbounce pages—the way you choose to integrate depends on whether you want Fullstory to run on every page of your domain or only on specific pages. We’ve outlined the differences between the two options below.
Installation
Option #1: Unbounce Script Manager (Recommended)
The Unbounce Script Manager saves you time by allowing you to add a script to all the pages of a domain rather than a single page (see option 2 to learn about putting Fullstory on individual pages). This is the best option if you want Fullstory to run on every page of a domain. To get started, follow the steps below:
- Log in to your Fullstory account, go to Settings > Data Capture and Privacy > Fullstory Setup, and copy your data capture snippet.
- Log in to your Unbounce account, go to Settings > Script Manager.
- Select Custom Script, and name it (“Fullstory” is a good name for it).
- Select Add Script in the top left of the page, and paste in the Fullstory snippet that you copied in step 1. Be sure that you’ve selected “Head” in the Placement drop-down and where you want the script to run in the Included on drop-down (selecting “All” means that Fullstory will run on all the pages of the domain you’ve selected). On the right-hand side of Script Manager, select the domain where you want the script to run (e.g. yourwebsite.com).
- Once you’ve saved your changes, you will see the number of domains and pages that the Fullstory script is running on.
Note: we recommend passing your Unbounce Experiment and Variant names into Fullstory. To do so, follow the instructions in the "Passing in Experiment Names & Variant IDs" section below.
Option 2: Javascripts
Unbounce’s editor allows you to run scripts only on specific pages rather than an entire domain. This is done by pasting the Fullstory snippet in the Javascripts section of the Unbounce editor. This can be done by following the steps below:
- Log in to your Fullstory account, go to Settings > Data Capture and Privacy > Fullstory Setup, and copy your data capture snippet.
- Log in to your Unbounce account, click the name of the page where you’d like to run Fullstory.
- Select Edit on the variants where you’d like to run Fullstory.
- Click Javascripts on the lower left-hand part of the Unbounce editor, and then Add New Javascript.
- Click Add Script to this Variant, name your script (“Fullstory Snippet”, for example), and paste in the snippet you copied in the step 1. Be sure that you’ve selected “Head” in the Placement drop-down.
- Select Save Code.
Passing in Experiment Names & Variant IDs (Optional, but recommended)
When A/B or multivariate testing, Unbounce users often want to compare how people interact with the different variations of their pages. By passing custom variables from Unbounce to Fullstory, it’s possible to see and compare user sessions by things like experiment name and variant name.
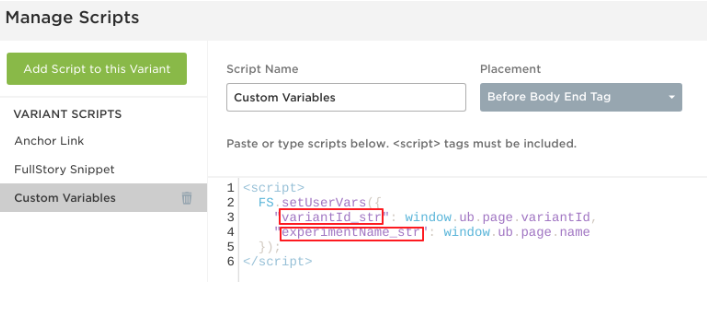
You can pass in Experiment Name and Variant ID by following the steps copying the snippet below:
<script> FS.setUserVars({ "variantId_str": window.ub.page.variantId, "experimentName_str": window.ub.page.name}); </script>
Now follow the steps you used to add the Fullstory snippet to your pages, but instead of selecting “Head” in the Placement drop-down, select “Before Body End Tag” and select Save Code.
 Passing in Additional Data (Optional)
If you’re interested in passing in custom variables other than experiment and variable names, you can learn how to easily do so here; if you’d like to pass in usernames or emails for users that you’ve already identified, you can learn how to here.
Once you’ve constructed the JSON object containing the key/value pairs you’d like to capture, simply add the script by following the same steps you followed to add the Fullstory snippet to your pages, but instead of selecting “Head” in the Placement drop-down, select “Before Body End Tag”.